Casting abaca on HVAC ducting part II
This design had to be put together off the ducting because of the many slender parts. We sprayed it regularly with water as we worked. Once we had the design we liked, we rolled it onto the ducting. Unlike solid ducting casts, we left the ducting straight out.
This design had to be put together off the ducting because of the many slender parts. The design emerged over a couple of hours over several days. We sprayed it regularly with water as we worked. Once we had the design we liked, we rolled it onto the ducting. Unlike solid ducting casts, we left the ducting straight out.
Early days. Glad the yellow blocks came & went.
The final version.
The piece is on no-see-um screening which lies on top of plastic sheeting. The no-see-um keeps the piece from “sticking” to the plastic & thus making it much easier to manipulate as quickly & fluidly as we need to when working up a design. The black ink lines on the plastic do not represent the ducting, but instead a “homemade” ducting mold we made for this piece. We’ll do a post on that mold in a future post. You’ll be able to see why putting this design on it was not going to happen.
Each evening, we covered it with plastic. When the still-wet design was finished and well fingernail-pressed together, we put a layer of methyl cellulose on both sides. The methyl took a few hours to soak in enough that we could transfer the final design to the ducting.
Barbara straightening and neatening the design after we rolled it on. After stencil brushing the wet paper into place, we started putting the magnets on.
The transfer was easy. The design was on a sheet of plastic & no-see-um. We laid the ducting on top and wrapped the plastic around ducting. We rolled the ducting until the design was topside and removed the plastic & no-see-um.
The piece needed many more magnets than a continuous design. Every place where the strips were not attached to each other was going to dry with a mind of its own. That was asking for a colorful piece of beef jerky. The narrower the strip, the more magnets per squ inch. You can also see the solid area of lime, white and pink stripes needed very few magnets.
Before we thought to use packing tape, we used little squares of thick cotton fabric to prevent the magnets rusting the paper. Dry erase boards with the addition of cardboard covers are ideal for storing magnets.
Casting abaca on HVAC ducting pt 1
Casting ducting with its stiff spiral of spring steel wire create flexible & structurally strong forms.
Colorfully clear abaca salad - detail 2017 cast handmade abaca papers, paper-dipped wire 13' x 7' x 4'
Flexible, uninsulated ducting is great for casting. The kind we’ve salvaged from construction sites a couple of times is a 24“ diameter spiral of spring steel wire wrapped in a thin, durable skin of coated fiberglass fabric.
Building a design. Normally, we’d keep the wet paper loosely attached as we find our design. However, the shapes can slide about on the curved surface, so we firmly stencil brush the shapes onto the ducting as we put them on.
24” flexible ducting in the studio
The final design. The grey patches are the ducting showing through. Windows make the form a more interesting and are also useful when we’re composing & cobbling objects together to make a work.
We either create a design directly on the ducting or on a table and then transfer it to the ducting. Either way, our 8' or so of ducting starts out fully extended, straight out. We want the surface as close to a smooth cylinder as possible. We'll put a weight in either end to keep it from relaxing too much.
Usually, we'll do a single layer from sheets of double-couched abaca beaten 5 hrs and lightly (body weight) pressed.
The mirror below the mold helped us to see quickly if the wet paper was beginning to drop off the ducting as we were positioning it.
Once the design is in place and the wet paper has been lightly pressed onto the fabric, we’ll brush on a layer of methyl cellulose. After that has a few hours to soak in, we’ll twist & bend the ducting to find a position or "pose" that we like. Then, we'll brace it in place with weights, blocks, ropes & clamps. The wet paper holds onto the fiberglass fabric well if the positioning phase is gentle.
This shows how tight and dramatic the ribs can be. Sometimes, these tight bends can cause the wet paper to slide away from the fabric. Fixing that involves holding the bend apart and using a tiny stencil brush to gently push the paper back into the folds.
One could produce a tube if the paper went all the way around the ducting. Then, it could be cut off when dry. However, the form gets awkward to compose with and has a clunky catapillar look. We generally cast half way around.
For drying, we use 1/2" earth magnets on the wire ribs to restrain the paper. Occasionally, they leave a light embossment. The spring steel cause the magnets to rust onto the wet paper so to prevent that the magnets are wrapped in packing tape. When the magnets begin to go on, the ducting has to stay put. They tend to "jump" to each other if the ducting jostles much. (The rapid-fire clicking of magnets slamming together as they pop away from where you so carefully positioned them can make you weep.)
The blue tape shows how much the abaca shrank. We took this photo after 2/3 of the magnets had been removed.
The scallops between the wires and the curve of the cylinder provide the cast with a lot of restraint as well. Despite that and the magnets, the 5 hr abaca will shrink a great deal.
Depending on temperature & humidity, a conduit will dry in about a week. It's faster if there is a forced air heater blowing through the ducting.
The resulting object is durable, structural and dimensional.
common sense alert: If you try casting some ducting, use only new & hose it down well with sudsy soap to rid any fiberglass residue from the manufacturing process. Wear nitrile gloves. If you're not sure a length of ducting is safe to handle, do not use it.
driving cross country with Lil 2018 cast cotton and abaca handmade papers, plywood with paint and tape 5' x 6' x 1.5'
Line drawings out of abaca paper straps
We wove straps of overbeaten abaca and then cut the weavings into 2” x 3” pieces for the 2019 Swatch Swap book.
woven abaca straps cut down to 3” x 2” (very approximately in some cases) and ready to be sent for Swatch books
2” x 3” nets for the swatch swap book.
This year it is being produced by Yama Ploskonka of Papel Texano in Austin Texas. To make them, we put a bunch of holes in a piece of pink insulation foam and set it in a vise.
Barbara weaving abaca straps through insulation foam board which produces a net on each side
We wove strips of abaca through and across the board.
When we worked on either side, it felt like a fibrous version of the old game, Battleship. The result was 2 webs of abaca (one from each side) which we cut into these roughly 2” x 3” shapes. We waxed them with beeswax and poppy oil to bring up the black and brighten the green and blue.
the abaca straps were cut with rotary scissors to different widths for the weaving
a pair of nets of abaca straps after they dried and each side was cut off the pink foam board
We had to make 6 of these 2x webs to get 110 swatches. We sent Yama 105.
sample of our 3” x 2” design
Later, we thought, “These might scale up pretty well. . .”
we decided to go large. . .
LandesSullivan at gmail.com
slush pulp: bespoke drawing paper
We’ve been making pastel drawings for a while now. We wondered how we could bring the drawing and the sculpture together. Making our own drawing paper seemed a start.
there’s tooth and then there’s texture
The paper we use is lightly beaten cotton rag. We couched several sheets onto the vacuum table. We distressed and rearranged them to give them an all over texture with irregular contours and negative spaces. We drew with pastel and charcoal on the still wet, lightly vacuumed sheet.
shaped and embossed drawing paper, thick and textured
We’ve been making pastel drawings on store-bought for a while now. We wondered how we could bring the drawing and the sculpture together. Making our own drawing paper seemed a start.
To get some openings and cool contours, we broke up the sheets by couching askew on scraps of pellon. Then we crudely perforated them with finger tapping. Finally, we’d couch what was on the pellon elsewhere on the construction site.
a sheet, freshly couched and manipulated before vacuuming.
pastels on wet paper: you’ll never go back
After about 1 minute of vacuum table, we began to draw on the still sodden paper with soft pastels which glide on creamily. The black has a particularly crisp woodcut look as the stick lightly pulls across the textures we’ve impressed into the paper.
Our “sheet” is about 42” x 54” and constructed from three 18” x 24” and two 8.5” x 11” deckle boxed sheets of cotton rag.
We further distressed the surface by impressing some things during vacuuming. The drawing took several days to dry.
To see another drawing made the same way, go to paper objects.
LandesSullivan at gmail.com
Pastels on wet paper dry with rich variety - in places looking part of the paper or a wash of color and elsewhere the pastel sits on the surface as if block printed. The pastels need less fixative when applied this way.
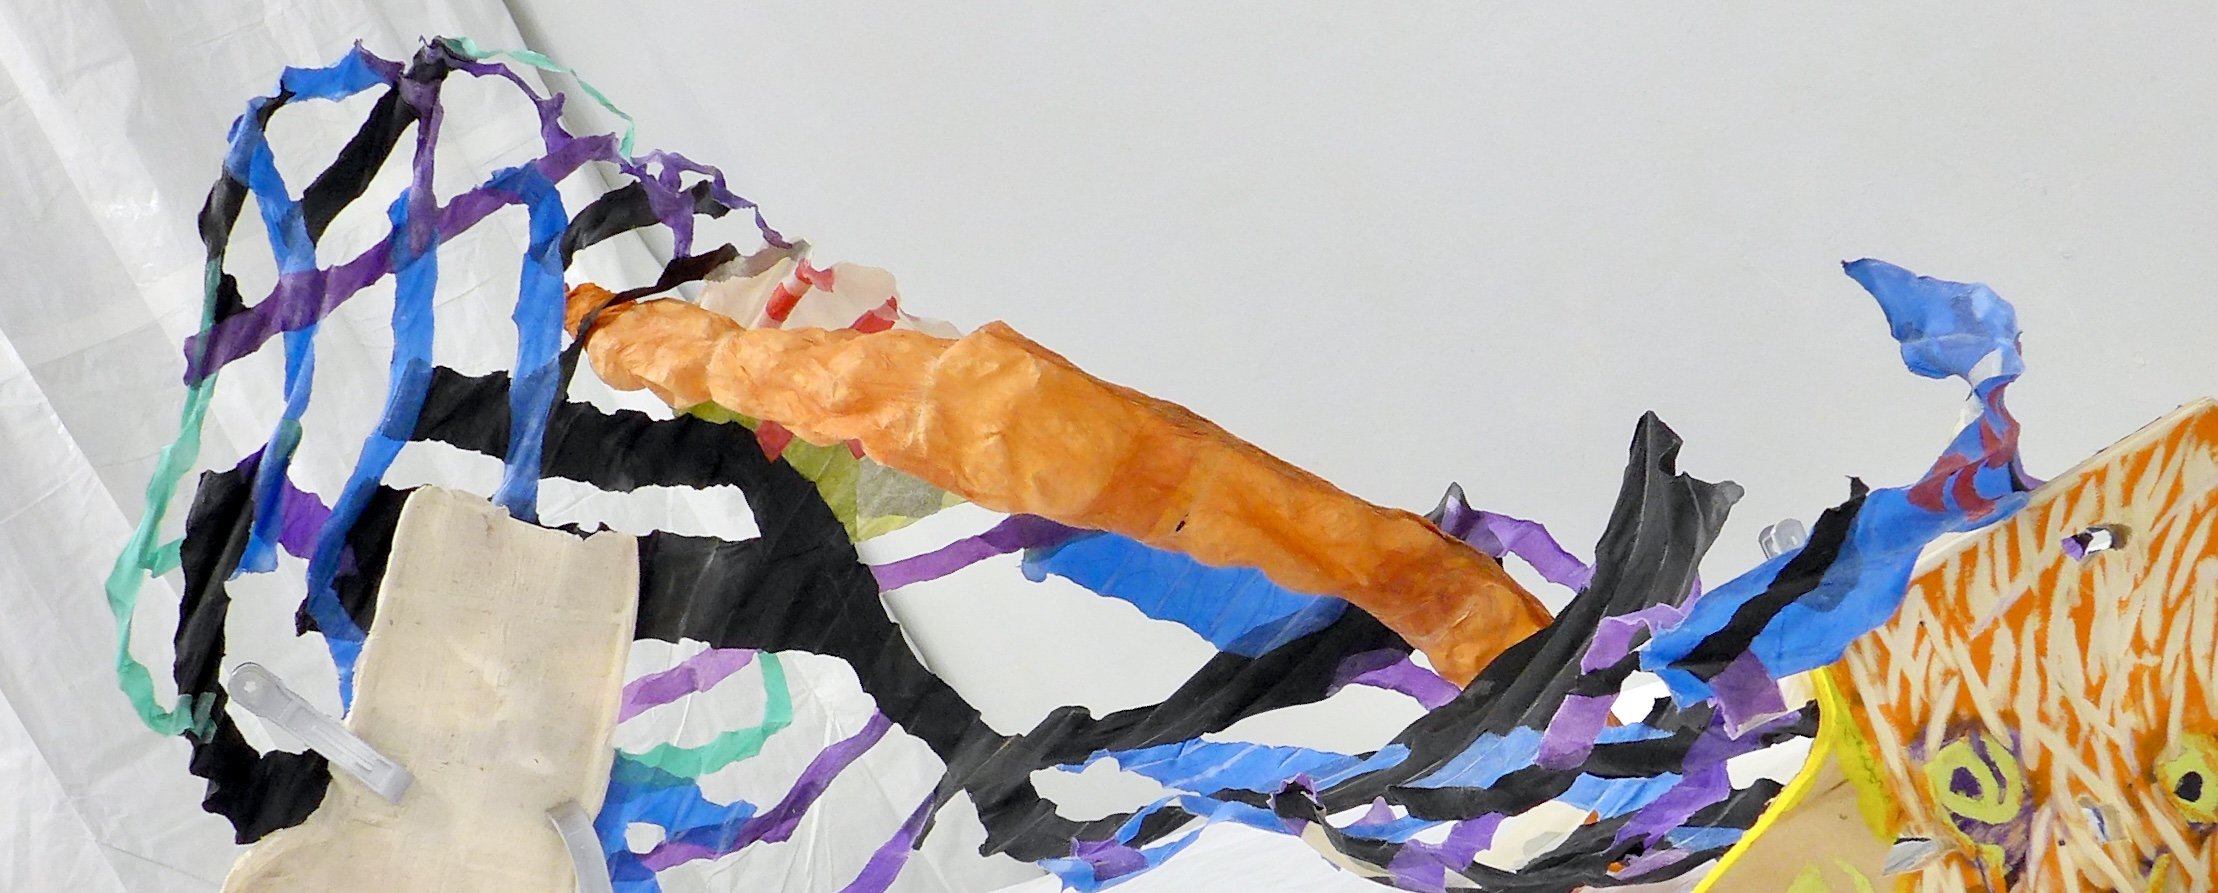
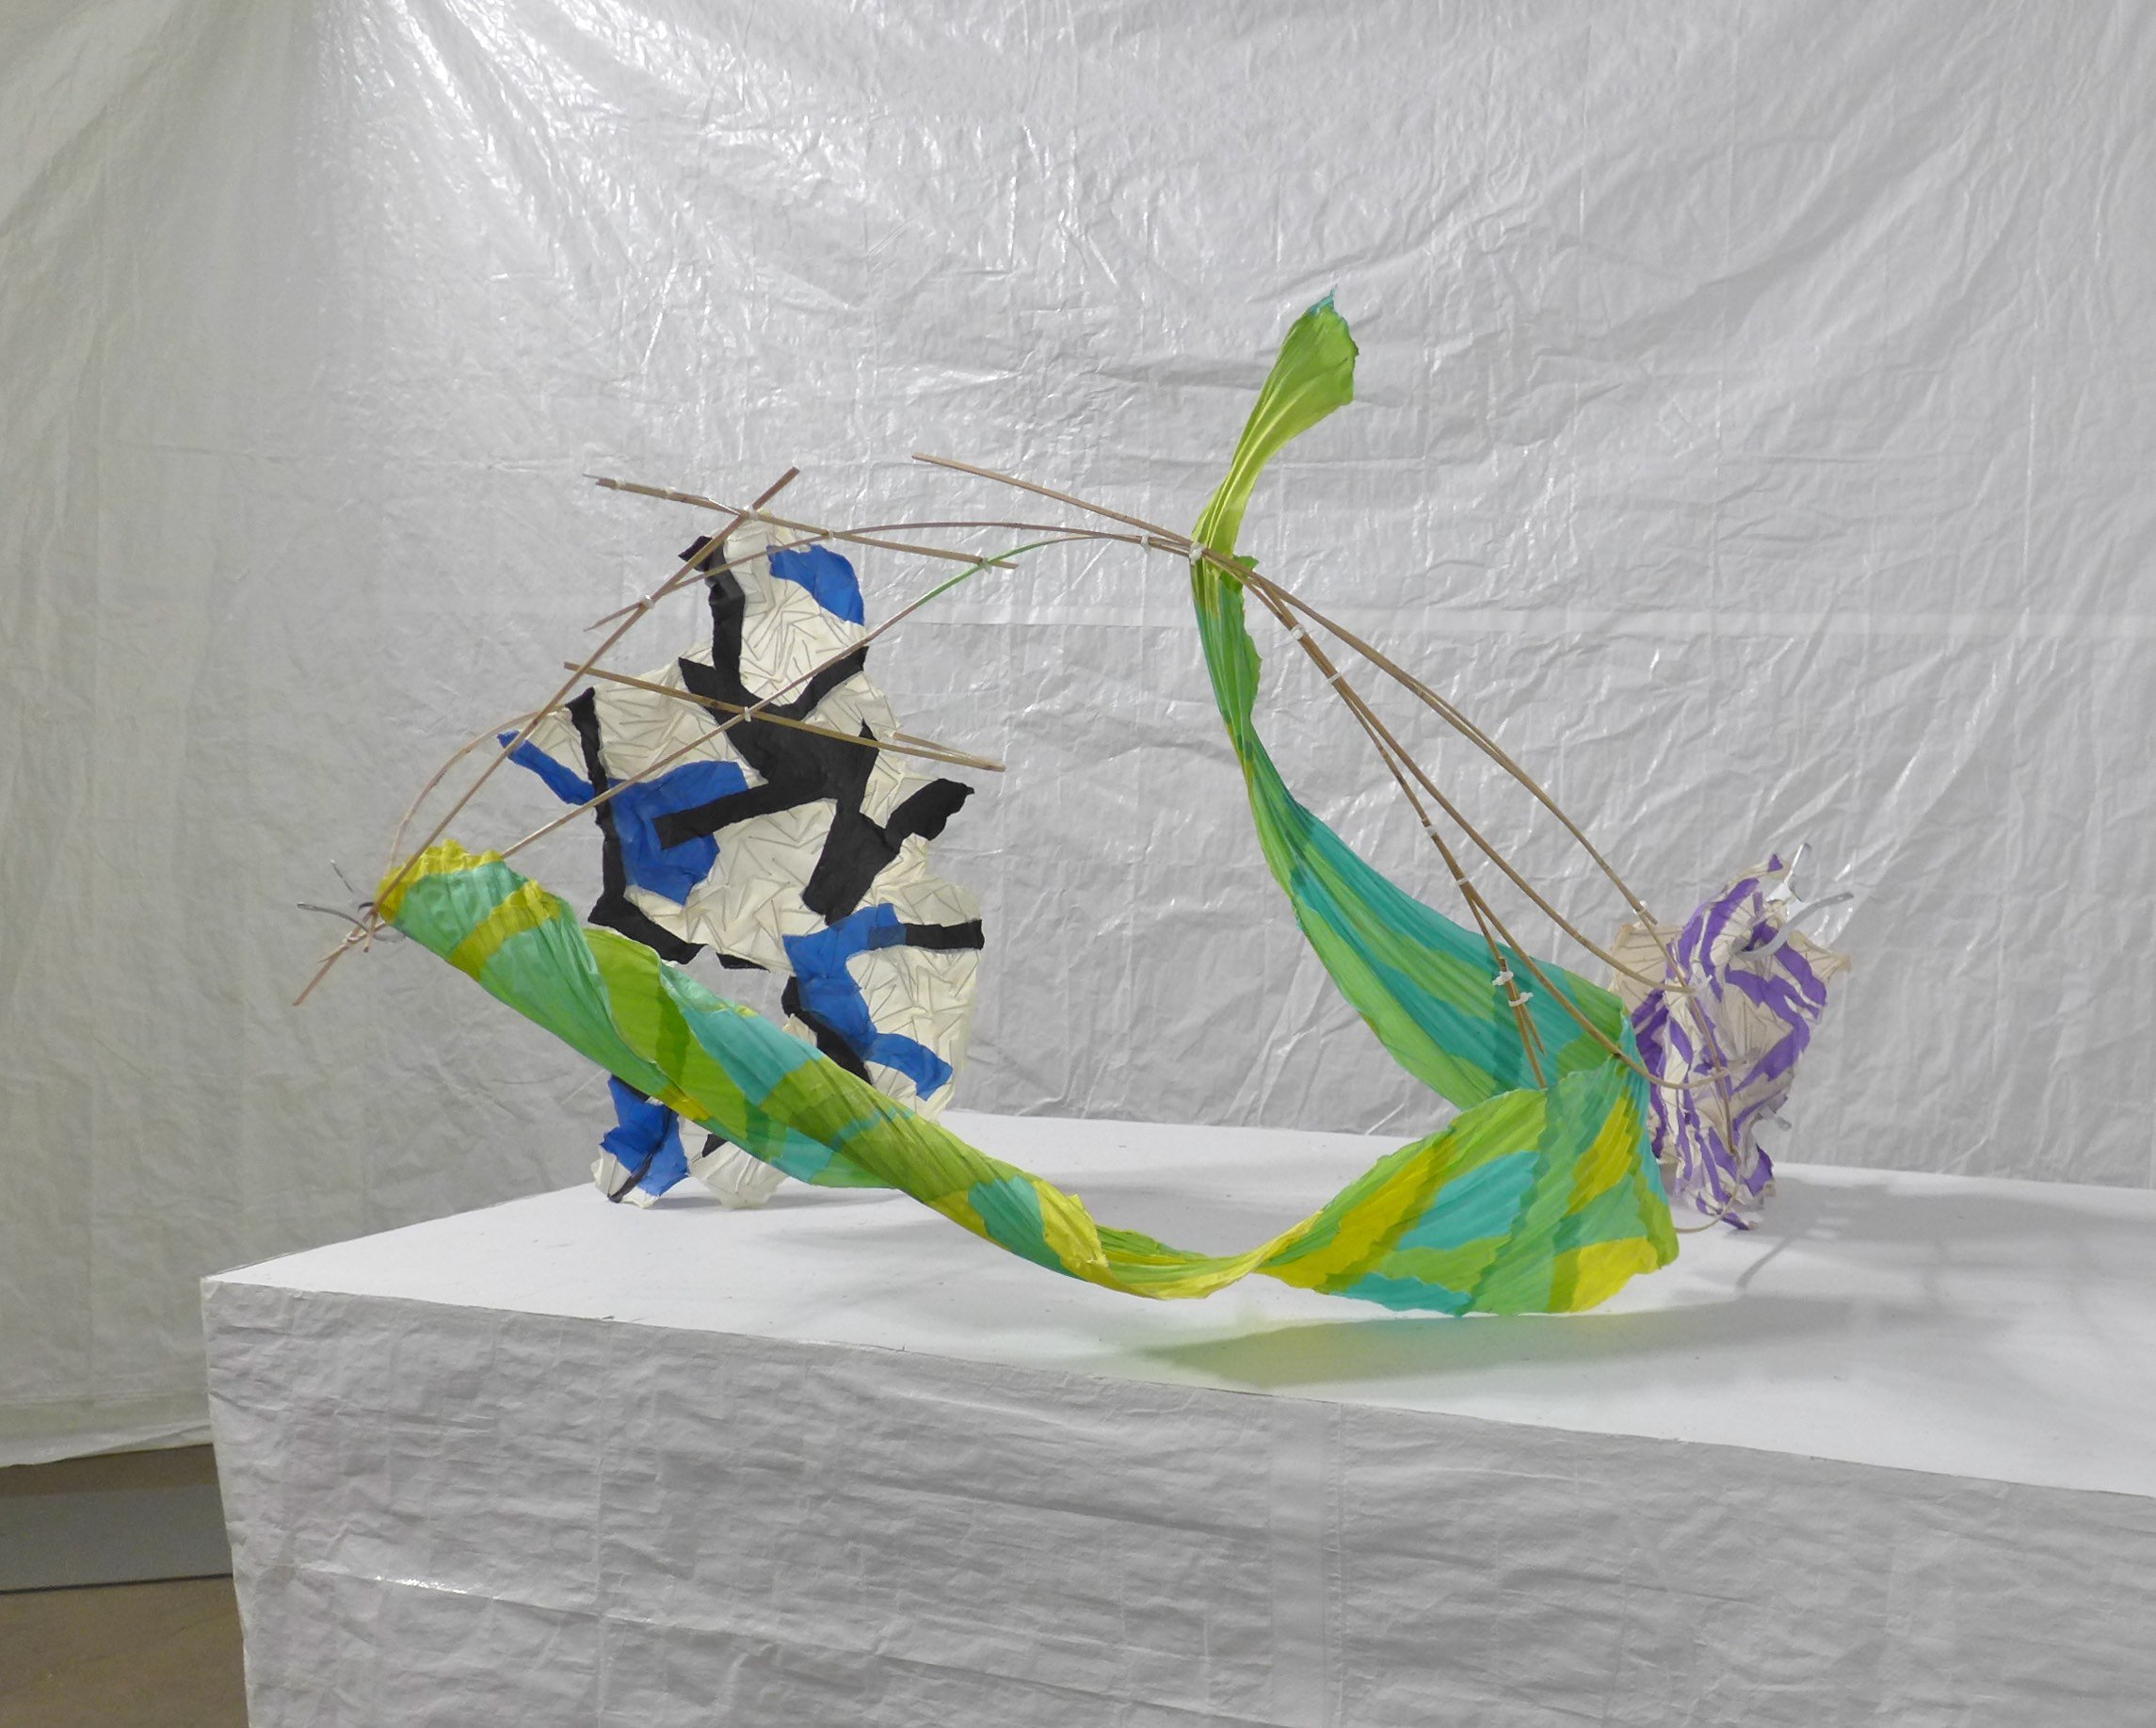
bamboo ribs, abaca skin
We have made several of these bamboo and abaca structures and we’re still learning. We’re inspired by Peter Gentenaar’s amazing works.
abaca and bamboo artwork held up to the light to show the translucency of the paper
We have made several of these bamboo and abaca structures and we’re still learning. We’re inspired by Peter Gentenaar’s amazing works.
bamboo slivers and hot glue
Bamboo design, hot glued together. We taped off the contour on a pellon on top of a felt on a vacuum table. Then took the bamboo frame away.
pouring the pulp
We laid on the 6 hour abaca pulp as evenly as possible. We drained about 2/3 of the water to make it easier to handle. We put the bamboo back in position and covered just the ribs with more fiber pulp.
See For the other side to see an object like this one in a composition.
Assisting the shrinkage
With the pulp vacuumed until it was dry/stong enough to lift, we set blocks and bunched cloth under it to help the bamboo and pulp to dry in an aesthetically interesting way.
As it dried, we pushed the manipulation further.
We inadvertently made it very thick, but the dry object still glows in back light. It would hold up well as a wind spinner in a Wisconsin winter storm.
LandesSullivan at gmail.com
How we work
Our working method is discontinuous
We're sculptors who work with paper. We make paper objects that we find visually alluring, but seldom think of them as sculpture.
These objects become a wonderful, reusable stash of found objects that we just happened to have made ourselves. We put them together with other elements, paper or otherwise (usually wood, foam board and wire), to create our sculptures.
Table top sculpture made using 3 pieces from our paper objects inventory combined with a split bamboo frame.
Our working method is discontinuous
Some of our inventory of handmade paper objects that we draw upon when composing or putting together sculptures. As you can see, we combine the paper with other materials like shaped plywood and rope.
We're sculptors who work with handmade paper. We use it to make objects that we find visually alluring, but that we seldom think of as finished works.
Instead, these objects become part of an inventory or a stash of found objects that we just happened to have made ourselves. To create our sculptures, we put the objects together with other elements, paper or otherwise (usually wood, foam board and fencing wire).
Fabricating the flowing twisting object that appears in the sculptures shown on this page. The mold is a wire-ribbed, springy HVAC ducting that is held into position with an arrangement of ropes, hooks and clamps.
The cast removed from the mold and shows off the abaca’s translucent glow from the sunlight outside.
The objects are the actors and the sculpture is the play. The objects appear and reappear in our works like a troupe of actors recasting themselves for each new production.
We divide our time in the studio between designing and crafting new paper objects and using the current ones to make sculptures and installations. If an object never seems to fit in, we’ll put it in a pile of things to be “recalled to life” (see Tale of 2 Cities) or RTL.
Damn old work and storage units!
Artworks are thus created, exhibited or at least documented. They're then disbanded and the parts recycled into new work. If the need arises and the parts are not elsewhere in use, we'll recreate an artwork.
for more on making some of our objects, see our blog especially posts about puffers (high and low shrinkage papers combined) or blowouts (using water spray on wet paper) or casting on edge (edges being copper sheet).
To see other objects made by using HVAC ducting as a mold, go to paper objects.
To see them as part of works, see some table top pieces as well as the pieces in our show We like them like that.
LandesSullivan at gmail.com
The finished paper piece is strong and springy, known between us as “boa.”
Watching my brothers' poolside stress and strain 2018 cast cotton and abaca handmade papers, plywood with pulp 60" x 60" x 18"
Mooring 2019 handmade abaca and cotton papers, bobby pins, wood, paint 8' x 9' x 3.5'
casting on edge
Crumple some copper sheeting with a rubber mallet and set it on edge. Drape a long sheet of wet paper over it. Dribble in some pebbles in the valley to sharpen the peaks.
Crumple some (gifted) copper sheeting with a rubber mallet and set it on edge. . .
Zig zag the distressed metal back and forth, duct taping the bottom edges of a few of the zigs to zags to keep it from getting out of control.
Next, seam several lightly pressed, wet sheets of 5 hr abaca paper end to end to make a sheet longer than the coppery mold in order to have lots of material to drape between edges.
Drape a long sheet of wet paper . . .
into position on the copper. Gently press/massage the sheet to smooth and round the valleys between the copper edges. Leave the paper taut and sharp over those edges. Those edges will dry crisp and thin, giving the sheet a staccato rhythm of choppy waves and a remarkable structural stiffness.
Dribble in some pebbles . . .
to keep the abaca taut and from shrinking up flat between the copper edges while it is drying. They also slightly dimple the paper. Took 4 days to dry.
Try it again bigger. . .
Compose with it. . .
Jumble the copper a bit . . .
to get off the pier and into a roiling sea. Notice copper’s color is pretty nice too.
Holes in your soul help you breath out 2018 cast abaca and cotton papers 3’ x 4’ x 1’ see recent work. about the blue object see Holed’er post.
LandesSullivan at gmail.com
Blowouts - water spray on freshly pulled handmade paper
We deckle boxed a sheet of mixed black and white cotton pulp. After removing the deckle, we lay some weighty, interesting shapes on the sheet (in this case some steel clamps.) Then we remove all the pulp still showing by blowing it out with the spray from a water hose. The weight of the objects keeps the water pressure from displacing them and disturbing the pulp beneath.
black and white cotton linter blowout couched onto a peach backing sheet
Blowouts of clamps, fresh and wet, dry and used.
We deckle box a sheet of mixed black and white cotton pulp. After removing the deckle, we lay some weighty, interesting shapes on the sheet (in this case some steel clamps.) Then we remove all the pulp still showing by blowing it out with the spray from a water hose. The weight of the objects keeps the water pressure from displacing them and disturbing the pulp beneath.
Pulled a sheet of cotton paper and laid clamps on the sheet while still on the mould to protect the fiber in those places for the blow-out
We used our fingers and a water spray to blow away the paper around the clamps. When we lifted off the clamps, we had our clamp shaped silhouettes of fiber.
blowout couched on backing sheet
After the clamps are removed, what is left is then couched onto an orange base sheet. Both the black and white sheet and the orange are from cotton rag and linters and were formed with a 12" x 18" deckle box. We did several of these sheets, one of which was torn into strips and collaged into one of the works shown below. Most of another sheet was wrapped around the abaca coils that bend a scrap of luan as seen in the other work.
We learned this technique at an open studio session at Dieu Donné paper mill.
A couple more examples -
after blowing the visible pulp away from a thrift store placemat
peeling back the place mat mask
ready to be couched on to a base sheet
a light uneven touch brings off an artistic amount of pulp onto the base sheet.
The first blowout and a 2nd one a few minutes later
sketched a tangle on a sheet of rubber, cut it out. the scattered pulp like that at left is often quite dramatic and often becomes part of what get couched onto the backing sheet
getting masks off the wet sheet can be tricky that can require a lot of pressing, peeling and lifting
ready for couching on to a base sheet
We used a scrap of one of the blowout sheets at the top to encircle the network of coils on this bent wood piece. This work is from table top works
There’s something tiger stripe-like about this blowout. We think that gave us the idea to cut one of the sheets in strips of stripes. This tapestry was in a juried show organized by a friend in Green Lake WI. She walked by it for a month in the gallery and decided she needed to keep walking by it every day. more like this in paper objects
LandesSullivan at gmail.com
making puffers
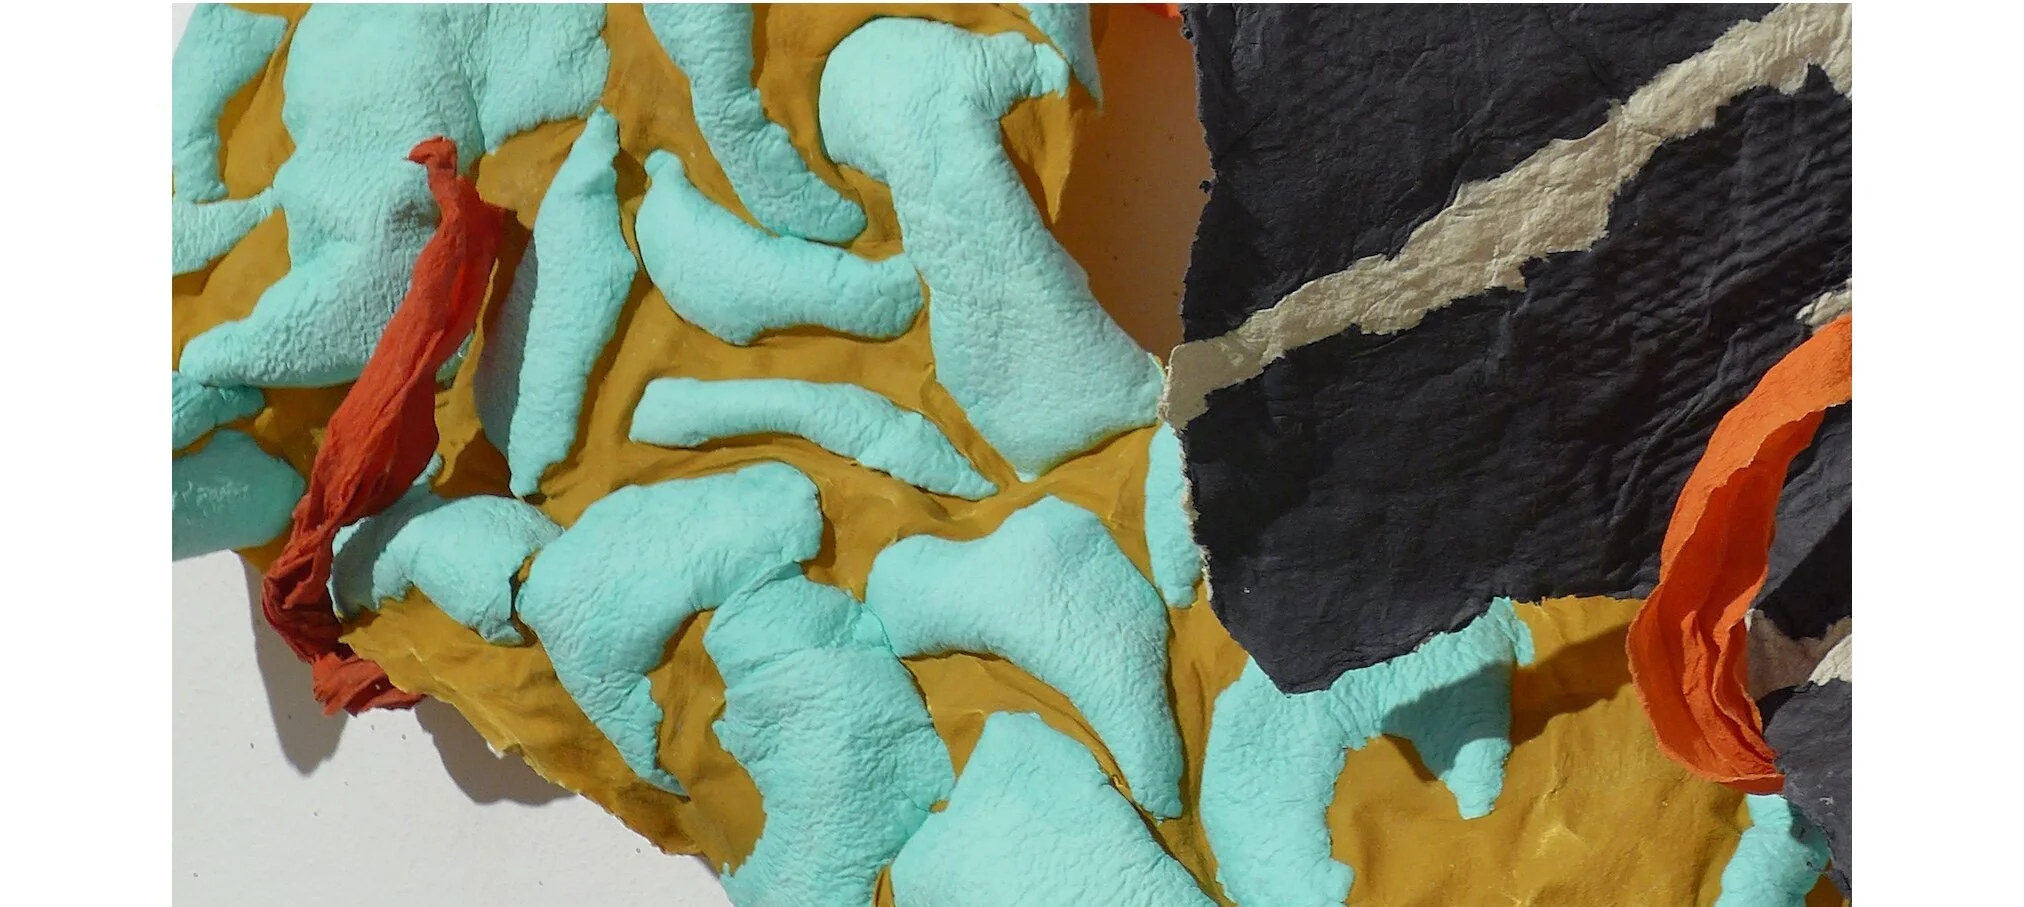
Putting a patch of low shrinkage cotton fiber onto a high shrinkage ground like abaca produces a wonderful puffing effect.
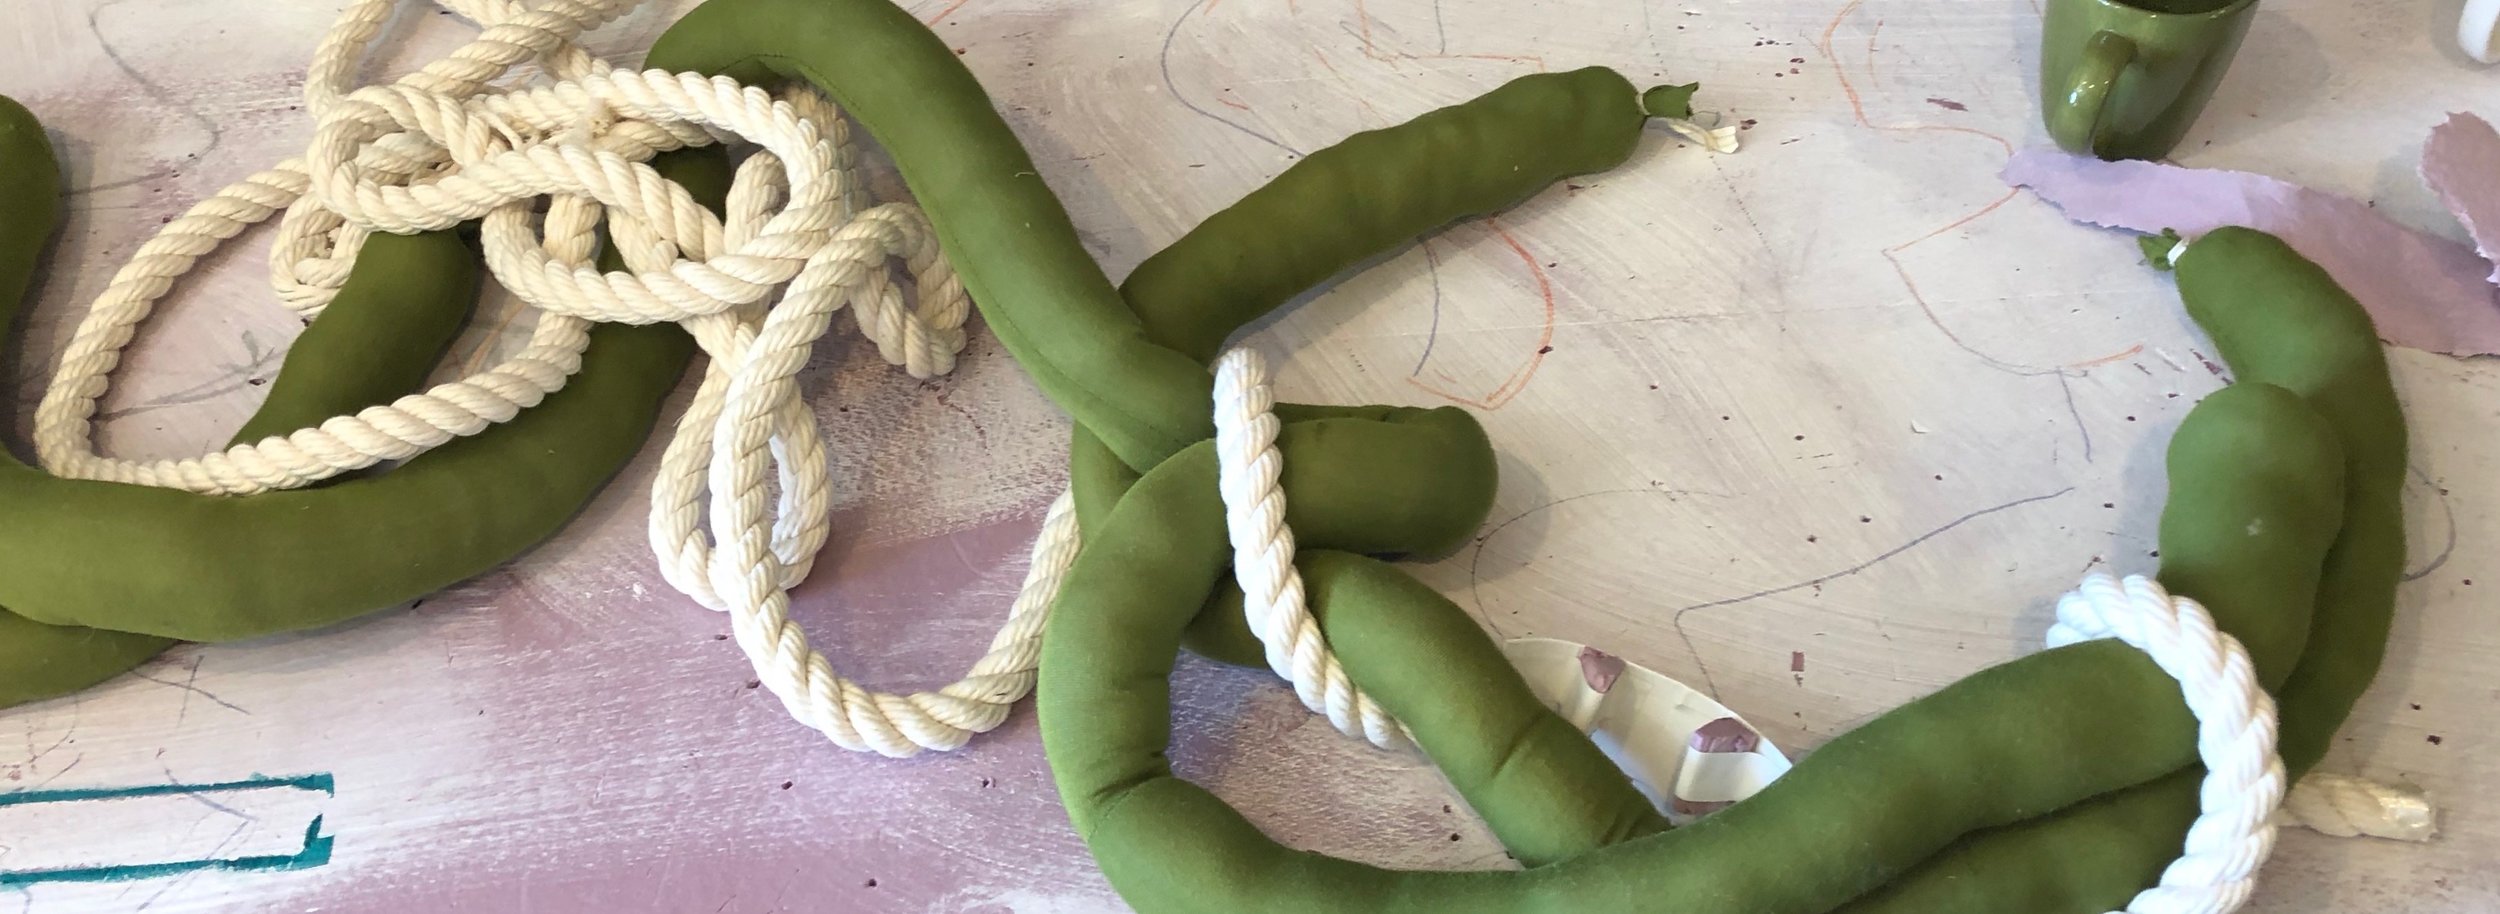
 The post follows the creation of the puffer shown above.
Detail of a work incorporating a “puffer,” see recent work
Lightly beaten cotton on overbeaten abaca will puff up when dry.
Here, the ochre ground is abaca beaten 6 hours. It shrinks a good bit (maybe 30%) by itself. The veronese green shapes are 60 - 75 minute cotton linters which produces a low or no shrinkage fiber. When a low shrinkage patch of cotton is stuck on a sheet of high shrinkage abaca, the tension during drying makes the cotton area puff out to accommodate the greater shrinkage of abaca.
step by step process to make a “puffer”
The purposely irregular shape in Photo 1 is made up of still wet, but pressed ochre abaca sheets. The next photo is a thick sheet of freshly pulled cotton broken into shapes while still on the mold. These shapes are then couched individually - and carefully - onto a scrap of pellon or even onto a large hand. Then they are transferred onto the ochre ground.
In Photo 3, Barbara is “couching” a cotton shape from pellon to background abaca. Once we had the shapes in place, we blotted them again with a large piece of pellon. We liked the light coming through the wet parts of the pellon as we peeled it away so we include it here even though it also shows our dye still running a little bit.
As shown by the sheen in photo 6, we slathered on the methyl cellulose, a reversible glue, that will help strengthen the bonding of the abaca and cotton. (The cotton could pop off the abaca as it dries because of the shrinkage differential.) We left it uncovered overnight. It finished drying quite quickly the next day in the hot summer sun.
We tend to think of the front of the sheet as the two color side, but it is beautiful on both sides. Either side may face out in any particular composition.
LandesSullivan at gmail.com
The "puffer" is the central focus in this work called Stay, I'm coming all this way to show you something
Talking on the phone with Joan 92
Heftier coils - part 4
The next step for our coil evolution - making them heftier and more resilient to studio and composing wear and tear. Without losing the linear drawing in space feel, we also want to make them more sculptural.
Bathroom/window sealant became our medium for cores. We tried several. The one we went with cured the fastest, retained a nice rubbery feel and was the strongest when tugged on.
some non-silicon sealant coil cores ceremoniously curing outside the studio
finding a suitable core for coil among sealants
The next step for our coil evolution - making them heftier and more resilient to studio and composing wear and tear. Without losing the linear drawing in space feel, we also want to make them more sculptural.
Bathroom/window sealant became our medium for cores. We tried several. The one we went with cured the fastest, retained a nice rubbery feel and was the strongest when tugged on.
3 beads of DAP sealants - latex, non-silicon and silicon on wax paper.
Use freezer paper for the non-silicon sealant. On wax paper, it managed to melt a gouge in the insulation foam board without damaging the wax paper. Compare this photo taken 2 days after the one above when it was first squeezed out.
curing took a long time to be tack-free
the perfect sealant other than being a bit pricey
We tried 3 sealants - latex, non-silicon and silicon.
The latex bead at its fattest never really felt fully cured and stayed squishy soft. It seemed weak when tugged on.
The silicon didn’t offer any manipulation while still uncured. Just a recalcitrant stickiness. It also doesn’t feel very strong in its cured floppy ropey state. Afterall, it is designed to stick and fill a rigid surface.
The DAP Ultra Clear non-silicon worked best for a couple of reasons. We could more easily squeeze out a wonky, fat then thin bead. It’s somewhat workable when “wet.” It felt the strongest of the 3 when ready to wrap with abaca.
It also cured the quickest - about a week. After several days, we could remove it from its backing sheet. It felt strong enough to support its own weight, so we hung it up to finish curing more quickly. We wore nitrile gloves when handling it even after it seemed well cured and not tacky. We also kept the studio well ventilated.
We rolled the core up the same way as we did for the other (coreless) coils. We lay strips of wet abaca sheets attached end to end. Then, it’s one long rolling wrap, completely sealing the core.
comparing the first beefed up, hefty coil @ 3’ long and a coreless coil.
Wrapping the core with abaca
The next sealant core coil has a fork in it. We thought to mummy wrap it, but it was problematic. Even with a lot of overlap, it tended to hinge along the spiraling seam. We re-enforced several places, but the problem still remained elsewhere. Next time, we’ll go back to the longitudinal wrap and use it in several overlapping sections.
mummy wrapping the core requires a lot of overlap to keep the wrap stiff. apologies the clear sealant is hard to see.
We added in more elaborate fences, skewers and lengths of duct tape to keep the coil in its 3 dimensional pose as it dried.
We thought if we left some of the sealant uncovered it would give us a bending and stress-relieving point. We later covered it. We decided the coil was resilient without the “tendon” showing.
The 2nd sealant core coil. It’s about 5’ long and weighs maybe half a pound.
LandesSullivan at gmail.com
These Coils change planes - part 3
Up to now, the coils have stayed on one plane, fabricated and dried on a flat table top. When we used them in compositions, we liked that when they were under load they lost their flatness and twisted into 3 dimensions.
We decided to make them 3 dimensional from the get go. Recently, we had some bright white rope piled on a work table. We wondered how we might make a coil act more rope-like and loop about in space.
making the abaca coils 3d from the get go
Up to now, the coils have stayed on one plane, fabricated and dried on a flat table top. When we put them under stress while composing with them, they twisted into a more interesting and 3d shape.
We decided to get some of that third dimension into the casting stage.
Recently, some bright white rope was piled on a work table. We wanted the coil to look and act more rope-like and loop about in space from the get go.
The skewers and fences cut from flashing adapted well to lifting the coil up and around in space while restraining it.
A nice first effort, at right, seems to be stiff and tough enough to hold up to the rigors of composing. Still, it is fragile being so thin. We really liked the delicate line it introduced into our work. We wonder, however, how a thicker coil might work.
So, fattening up the coils became the next challenge. . .
LandesSullivan at gmail.com
Playing up nothing: Making holes out of papers
We like negative space, so we cast some. We laid down some odd shaped plywood pieces and filled in the space around them with wet sheets of lightly pressed cotton paper. The pebbles were pressed in for texture.
We call this series of objects “holed’ers” because the pieces were initially, at least, holed by positive shapes.
We cast with blue jean cotton rag paper filling the spaces between the islands of plywood. The garden store pebbles added ripples of texture.
Holes in your soul help you breathe out 2018 handmade cast rage cotton and pigmented abaca papers, 30” x 38” x 11”
enclosing negative spaces - Holed’ers
We like negative space, so we cast some. We laid down some odd shaped plywood pieces and filled in the space around them with wet sheets of lightly pressed cotton paper. The pebbles were pressed in for texture.
We like the thick flange-like, shadow-catching edges that run around the shapes. The resulting form invites entanglement.
We call them “holed’ers” because the pieces were initially, at least, holed by positive shapes.
The second holed’er has more color.
We started laying down paper shapes to build up the form and let that process suggest where the holes would go. Unfortunately, the plywood shapes worked much better than these bland angular gaps. After covering up this side in black, we used some pastel to sketch out some hole modifications. Though we promptly covered up the pastel, we liked it and we use it again in our third holed’er try.
We laid out a patchwork of paper shapes and negative spaces before manipulating them, adding and subtracting as necessary.
The final piece has a nice exchange between the easy, verdant shapes on this side and the smoky blue and black of the reverse.
We increased the sizes of the holes by simply cutting and folding the paper back on itself rather than cutting it away. The benefit is that it gave us some color on the black side We also added some paper marbled with blue and black pulp. We dried the piece over large plywood shapes to complement the negative space contours as well as to give the piece some dimension and throw a little shadow.
That light veronese green pastel on the wet black rag paper was a simple guide as to where to tear and fold back. We’ve been using pastel on wet paper ever since because it is so dreamy, creamy and damn near unseemly.
We planned to trim away the folded back bits, but we decided they should stay put. The plywood mold with its similar contours and simple stepped relief was enough to give the piece some depth and gesture.
The next holed’er began with drawings generated by swopping a pencil or pastel back and forth.
We chose the colors and worked with them for a while before one of us said, “Those are Dunkin’ Donuts colors, aren’t they?” They are, but we were hooked on them by then.
studio shot of sketches for new holed’ers.
1st layer of new holed’er is constructed from pigmented cotton linters/abaca mix. We wanted to exaggerate the negative spaces so they’d compete with the colors for focus.
To chill the DD vibe a little, we again made one side a single color. This time white. We added some pastel to juice it a bit.
We tried water color, but painting on wet lightly pressed paper requires lightning brushwork. We found it easier to paint on scraps of wet paper and monoprint them onto the piece.
Pastel and monoprinting was used on the flip side to jazz up the bleak whiteness.
Taking advantage of the large netlike construction, we could flip parts front to back to push some dimensionality even before we used it in compositions.
The finished holed’er offers a lot of connections points for interlocking with other elements in composing our sculptures.
We were happy with the piece at this point. It looked OK as flatwork, but we were hoping it would be more dimensional and floppy. It also had to drape well with others. We chased away the flatness by folding over and twisting parts and then fitting them back together in a new way.
We love the piece but orange and pink always make it jump out of a composition. Recently, we spliced in the green straps to cool the other colors’ jets. We also cut and rearranged its parts to make it long and narrow.
LandesSullivan at gmail.com
Coils racing around flashing - part 2
Carving grooves in pink insulation foam board to cast coil designs seems clever, but impractical.
Our next idea is to use strips of aluminum flashing held in position with kebab skewers. They may have a miniature race track feel to them, but they work really well.
flashing and skewers hold the abaca coils in position
Carving grooves in pink insulation foam board to cast coil designs (see previous post) seems clever, but is impractical. You would have to gouge a busy road map of grooves to have much flexibility of design. Or go through a lot of pink foam.
Our next casting idea is to use strips of aluminum flashing held in position with kebab skewers.
coil design considerations: girthy is good
Here are a couple of design sketches of the several we made. The second one is the one we went with. While the other one seems good, we wanted a girthy design with large open spaces since that would allow us to connect other elements by pulling things through the openings.
Another consideration is fragility. The first image has a neck that sticks out without much support. It probably would bend and permanently crease with the amount of abuse we give our inventory. Abaca coils are pretty strong in tension. They don’t have much compression strength, so they fold without much load. Once folded, all you have then is a loose hinge.
fencing in the coil design
Below, the coil is walled in and ready to dry. Where the coil design has an opening too small to be fitted with a flashing fence, we used taped clumps of thicker skewers to guide the drying coils.
The detail image below shows the strength of 6 hour abaca as it lifted the flashing and pulled the skewer through the pink foam floor. To adjust, we removed the skewer, repositioned the fence to allow some shrinkage and then re-skewered.
LandesSullivan at gmail.com
Coils in the groove - part 1
We use a lot of hidden wire, velcro, tape and nails to attach our paper objects to each other, but we don't like hiding things. We prefer making connectors part of the work.
So we rolled overbeaten abaca into coils and figured out how to cast them into linear forms. An attractive length of stiff abaca "rope" seemed useful for cobbling things together.
Afternoon, November 29, 2018, waiting on a coil to dry.
visible connectors - coils of abaca
We use a lot of hidden wire, velcro, tape and nails to attach our paper objects to each other, but we don't like hiding things. We prefer making connectors part of the work. Along with their physical chore, they need to shoulder an aesthetic role.
Abaca is pretty strong when rolled into a coil.
As such, an attractive length of such stiff abaca "rope" seemed useful for cobbling parts of our sculptures together.
We rolled some 96” x 4” strips of 5 hour double-couched abaca into coils. Once dry the coils have some flex but they will permanently crease pretty easily. The restrained position you dry the coil in is what you get.
We moved the coil around on a sheet of pink insulation foam to find a design that would look good hooking parts of a sculpture together. Then we traced the design on the foam board and put the coil aside.
We used a cutter and carving tools to gouge out a groove to serve as a mold for the coils.
With the ends tacked down with T-pins, the coils shrank taut and stiffly structural. Even with a fan blowing across the surface, it took 12 days to dry - about 2x as long as expected. Foam board does not breath or wick.
If the dried coils are too thin, they lose some of their visual punch. It also makes them more vulnerable to hingeing which leaves a permanent crease in the coil.
LandesSullivan at gmail.com